Android Full Screen Video Playing

1.VideoApp.java

package com.javapages4all.videoapp;

import android.app.Activity;
import android.content.pm.ActivityInfo;
import android.net.Uri;
import android.os.Bundle;
import android.view.WindowManager;
import android.widget.MediaController;
import android.widget.VideoView;

public class VideoApp extends Activity
{
VideoView mVideoView;
MediaController mc;
@Override
protected void onCreate(Bundle savedInstanceState)
{
super.onCreate(savedInstanceState);
setContentView(R.layout.videoapp);

getWindow().setFlags(WindowManager.LayoutParams.FLAG_FULLSCREEN, WindowManager.LayoutParams.FLAG_FULLSCREEN);
setRequestedOrientation(ActivityInfo.SCREEN_ORIENTATION_LANDSCAPE);//if you want.

//File video = new File(“your file path”);
mVideoView = (VideoView) findViewById(R.id.myvideoview);
mc = new MediaController(this);
mVideoView.setMediaController(mc);
mc.setAnchorView(mVideoView);
mVideoView.setMediaController(mc);
//mVideoView.setVideoPath(video.getAbsolutePath());
mVideoView.setVideoURI(Uri.parse(“http://www.pocketjourney.com/downloads/pj/video/famous.3gp”));
mVideoView.requestFocus();
mVideoView.start();
}
}

2.videoapp.xml

<RelativeLayout xmlns:android=”http://schemas.android.com/apk/res/android&#8221;
android:layout_width=”fill_parent”
android:layout_height=”fill_parent” >
<VideoView android:id=”@+id/myvideoview”
android:layout_width=”fill_parent”
android:layout_alignParentRight=”true”
android:layout_alignParentLeft=”true”
android:layout_alignParentTop=”true”
android:layout_alignParentBottom=”true”
android:layout_height=”fill_parent”>
</VideoView>
</RelativeLayout>


3.AndroidManifest.xml

<?xml version=”1.0″ encoding=”utf-8″?>
<manifest xmlns:android=”http://schemas.android.com/apk/res/android&#8221;
package=”com.javapages4all.videoapp”
android:versionCode=”1″
android:versionName=”1.0″ >

<uses-sdk
android:minSdkVersion=”8″
android:targetSdkVersion=”18″ />

<uses-permission android:name=”android.permission.INTERNET” />

<application
android:allowBackup=”true”
android:icon=”@drawable/ic_launcher”
android:label=”@string/app_name”
android:theme=”@style/AppTheme” >
<activity
android:name=”com.javapages4all.videoapp.VideoApp”
android:label=”@string/app_name” >
<intent-filter>
<action android:name=”android.intent.action.MAIN” />

<category android:name=”android.intent.category.LAUNCHER” />
</intent-filter>
</activity>
</application>

</manifest>


admin Privilege for Tomcat7 in Windows

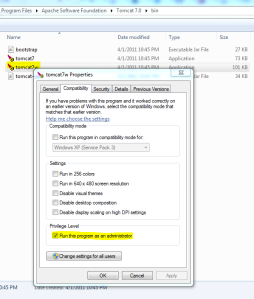
Right click on the tomcat7.exe (found at %CATALINA_HOME%\bin). Click on the Properties menu item and then select the Compatibility tab. Check the Run this program as an administrator checkbox under the Privilege Level section. Click the OK button.

admin Privilege for Tomcat7 in Windows

Getting IMEI Number

1.Android Device:

——————–

Dial *#06# to know your IMEI Number.

2.Direct Process:

——————-

Remove your battery and look for IMEI,you will find it.

3.Android Program:

———————-

You’ll need the

<uses-permission android:name="android.permission.READ_PHONE_STATE" />

permission in AndroidManifest.xml file to do this.

final TelephonyManager tm =(TelephonyManager)getBaseContext().getSystemService(Context.TELEPHONY_SERVICE);

String deviceid = tm.getDeviceId();

File Encryption and Decryption in Java And Android

package raja.JavaPages4all;

import java.io.File;
import java.io.FileInputStream;
import java.io.FileOutputStream;
import java.io.IOException;
import java.io.InputStream;
import java.io.OutputStream;
import java.security.NoSuchAlgorithmException;
import java.util.Date;

import javax.crypto.Cipher;
import javax.crypto.CipherInputStream;
import javax.crypto.CipherOutputStream;
import javax.crypto.KeyGenerator;
import javax.crypto.spec.SecretKeySpec;

public class AES
{
private static final String key = “1234567891234567”;
private static final String method = “AES”;
/**
* @param args
*/
public static void main(String[] args)
{
try
{
long stime=System.currentTimeMillis();
File inFile = new File(“D:/sample.wmv”);
File outFile = new File(“D:/sample_encrypted.wmv”);
File outFile_dec = new File(“D:/sample_decrypted.wmv”);
encrypt(new FileInputStream(inFile), new FileOutputStream(outFile));
long etime=System.currentTimeMillis();
System.out.println((etime-stime));
decrypt(new FileInputStream(outFile), new FileOutputStream(outFile_dec));
System.out.println(System.currentTimeMillis()-etime);
} catch (Exception e)
{
e.printStackTrace();
} catch (Throwable e) {
e.printStackTrace();
}
}

public static SecretKeySpec keyGen(String s) throws NoSuchAlgorithmException
{
KeyGenerator kgen = KeyGenerator.getInstance(method);
kgen.init(128); // 192 and 256 bits may not be available
byte[] raw = s.getBytes();
SecretKeySpec result = new SecretKeySpec(raw, method);
//System.out.println(“result “+new String(result.getEncoded()));
// Instantiate the cipher
return result;
}

public static void encrypt(InputStream is, OutputStream os)
{
encryptOrDecrypt(Cipher.ENCRYPT_MODE, is, os);
}

public static void decrypt(InputStream is, OutputStream os)
{
encryptOrDecrypt(Cipher.DECRYPT_MODE, is, os);
}

public static void encryptOrDecrypt(int mode, InputStream is, OutputStream os)
{
try
{
Cipher cipher = Cipher.getInstance(method); // DES/ECB/PKCS5Padding for SunJCE
if (mode == Cipher.ENCRYPT_MODE)
{
cipher.init(Cipher.ENCRYPT_MODE, keyGen(key));
CipherInputStream cis = new CipherInputStream(is, cipher);
doCopy(cis, os);
} else if (mode == Cipher.DECRYPT_MODE)
{
cipher.init(Cipher.DECRYPT_MODE, keyGen(key));
CipherOutputStream cos = new CipherOutputStream(os, cipher);
doCopy(is, cos);
}
} catch (Exception e)
{
e.printStackTrace();
} catch (Throwable e)
{
e.printStackTrace();
}
}

public static void doCopy(InputStream is, OutputStream os) throws IOException
{
/* byte[] bytes = new byte[1024];
int numBytes;
while ((numBytes = is.read(bytes)) != -1) {
os.write(bytes, 0, numBytes);
}
os.flush();
os.close();
is.close();*/

byte[] buffer = new byte[8192]; // Or larger (but use powers of 2)
int bytesRead;
while ((bytesRead = is.read(buffer)) != -1)
{
os.write(buffer, 0, bytesRead);
}
os.flush();
os.close();
is.close();
}

}

Batch insert to SQLite database on Android

try
{
  db.beginTransaction();
  for each record in the list 
 {
   do_some_processing();
   if (line represent a valid entry) 
   {
    db.insert(SOME_TABLE, null, SOME_VALUE);
  }
  some_other_processing();
 }
 db.setTransactionSuccessful();
} catch (SQLException e) {
} finally {
 db.endTranscation();
}

private void insertOneHundredRecords() {
          for (int i = 0; i<100; i++) {
                     ContentValues values = new ContentValues();
                     values.put("FirstNumber", i);
                     values.put("SecondNumber", i);
                     values.put("Result", i*i);
                     sampleDB.insert(SAMPLE_TABLE_NAME,null,values);
           }
}

private void bulkInsertOneHundredRecords() {
          String sql = "INSERT INTO "+ SAMPLE_TABLE_NAME +" VALUES (?,?,?);";
          SQLiteStatement statement = sampleDB.compileStatement(sql);
          sampleDB.beginTransaction();
          for (int i = 0; i<100; i++) {
                    statement.clearBindings();
                    statement.bindLong(1, i);
                    statement.bindLong(2, i);
                    statement.bindLong(3, i*i);
                    statement.execute();
           }
           sampleDB.setTransactionSuccessful();	
           sampleDB.endTransaction();
}

JDBC Driver Types

JDBC Driver Types

JDBC drivers are divided into four types or levels. The different types of jdbc drivers are:

Type 1: JDBC-ODBC Bridge driver (Bridge)
Type 2: Native-API/partly Java driver (Native)
Type 3: AllJava/Net-protocol driver (Middleware)
Type 4: All Java/Native-protocol driver (Pure)

4 types of jdbc drivers are elaborated in detail as shown below:

Type 1 JDBC Driver

JDBC-ODBC Bridge driver

The Type 1 driver translates all JDBC calls into ODBC calls and sends them to the ODBC driver. ODBC is a generic API. The JDBC-ODBC Bridge driver is recommended only for experimental use or when no other alternative is available.


Type 1: JDBC-ODBC Bridge

Advantage

The JDBC-ODBC Bridge allows access to almost any database, since the database’s ODBC drivers are already available.

Disadvantages

1. Since the Bridge driver is not written fully in Java, Type 1 drivers are not portable.
2. A performance issue is seen as a JDBC call goes through the bridge to the ODBC driver, then to the database, and this applies even in the reverse process. They are the slowest of all driver types.
3. The client system requires the ODBC Installation to use the driver.
4. Not good for the Web.

Type 2 JDBC Driver

Native-API/partly Java driver

The distinctive characteristic of type 2 jdbc drivers are that Type 2 drivers convert JDBC calls into database-specific calls i.e. this driver is specific to a particular database. Some distinctive characteristic of type 2 jdbc drivers are shown below. Example: Oracle will have oracle native api.


Type 2: Native api/ Partly Java Driver

Advantage

The distinctive characteristic of type 2 jdbc drivers are that they are typically offer better performance than the JDBC-ODBC Bridge as the layers of communication (tiers) are less than that of Type
1 and also it uses Native api which is Database specific.


Disadvantage

1. Native API must be installed in the Client System and hence type 2 drivers cannot be used for the Internet. 
2. Like Type 1 drivers, it’s not written in Java Language which forms a portability issue. 
3. If we change the Database we have to change the native api as it is specific to a database
4. Mostly obsolete now
5. Usually not thread safe.

Type 3 JDBC Driver

All Java/Net-protocol driver

Type 3 database requests are passed through the network to the middle-tier server. The middle-tier then translates the request to the database. If the middle-tier server can in turn use Type1, Type 2 or Type 4 drivers.


Type 3: All Java/ Net-Protocol Driver

Advantage

1. This driver is server-based, so there is no need for any vendor database library to be present on client machines.
2. This driver is fully written in Java and hence Portable. It is suitable for the web.
3. There are many opportunities to optimize portability, performance, and scalability. 
4. The net protocol can be designed to make the client JDBC driver very small and fast to load. 
5. The type 3 driver typically provides support for features such as caching (connections, query results, and so on), load balancing, and advanced 
system administration such as logging and auditing.
6. This driver is very flexible allows access to multiple databases using one driver.
7. They are the most efficient amongst all driver types.

Disadvantage

It requires another server application to install and maintain. Traversing the recordset may take longer, since the data comes through the backend server.

Type 4 JDBC Driver

Native-protocol/all-Java driver

The Type 4 uses java networking libraries to communicate directly with the database server.

Type 4: Native-protocol/all-Java driver

Advantage

1. The major benefit of using a type 4 jdbc drivers are that they are completely written in Java to achieve platform independence and eliminate deployment administration issues. It is most suitable for the web. 
2. Number of translation layers is very less i.e. type 4 JDBC drivers don’t have to translate database requests to ODBC or a native connectivity interface or to pass the request on to another server, performance is typically quite good. 
3. You don’t need to install special software on the client or server. Further, these drivers can be downloaded dynamically.

Disadvantage

With type 4 drivers, the user needs a different driver for each database.


Ruppe symbol showing in Android

package com.raja.customtoast;

import android.app.Activity;
import android.graphics.Typeface;
import android.os.Bundle;
import android.widget.TextView;

public class Ruppe extends Activity
{
@Override
protected void onCreate(Bundle savedInstanceState)
{
super.onCreate(savedInstanceState);
setContentView(R.layout.activity_main);

Typeface typeface = Typeface.createFromAsset(getAssets(), “Rupee.ttf”);
TextView textview = (TextView) findViewById(R.id.textView1);
textview.setTypeface(typeface);
textview.setText(“`”);
}
}

2) activity_main.xml:

<LinearLayout xmlns:android=http://schemas.android.com/apk/res/android&#8221;
    android:layout_width=“match_parent”
    android:layout_height=“match_parent”
    android:background=“#5F04B4”
    android:orientation=“vertical” >
    <TextView
        android:id=“@+id/textView1”
        android:layout_width=“match_parent”
        android:layout_height=“wrap_content”
        android:layout_marginTop=“10dp”
        android:gravity=“center”
        android:text=“Rupee”
        android:textColor=“#FFFFFF”
        android:textSize=“40dp”
        android:textStyle=“bold” />
</LinearLayout>
Paste in asserts

Android Video Streaming (Video View)

Video 

1.Test.java

package com.sample.test;

import android.app.Activity;
import android.net.Uri;
import android.os.Bundle;
import android.widget.MediaController;
import android.widget.VideoView;

public class Test extends Activity {

@Override
protected void onCreate(Bundle savedInstanceState) {
super.onCreate(savedInstanceState);
setContentView(R.layout.activity_test);

/*Intent move=new Intent(Intent.ACTION_VIEW);
move.setDataAndType(Uri.parse(“android.resource://”+getPackageName()+”/”+R.raw.video), “video/*”);
startActivity(move);*/

VideoView videoView =(VideoView)findViewById(R.id.videoView);
MediaController mediaController= new MediaController(this);
mediaController.setAnchorView(videoView);
Uri uri=Uri.parse(“android.resource://”+getPackageName()+”/”+R.raw.video);
videoView.setMediaController(mediaController);
videoView.setVideoURI(uri);
videoView.requestFocus();

videoView.start();
}

}


2.activity_test.xml

<LinearLayout xmlns:android=”http://schemas.android.com/apk/res/android&#8221;
xmlns:tools=”http://schemas.android.com/tools&#8221;
android:layout_width=”match_parent”
android:layout_height=”match_parent”
android:orientation=”vertical” >

<TextView
android:id=”@+id/textView1″
android:layout_width=”wrap_content”
android:layout_height=”wrap_content”
android:text=”@string/hello_world” />

<VideoView
android:id=”@+id/videoView”
android:layout_width=”match_parent”
android:layout_height=”match_parent” />

</LinearLayout>


3.AndroidManifest.xml

<?xml version=”1.0″ encoding=”utf-8″?>
<manifest xmlns:android=”http://schemas.android.com/apk/res/android&#8221;
package=”com.sample.test”
android:versionCode=”1″
android:versionName=”1.0″ >

<uses-sdk
android:minSdkVersion=”8″
android:targetSdkVersion=”17″ />

<application
android:allowBackup=”true”
android:icon=”@drawable/ic_launcher”
android:label=”@string/app_name”
android:theme=”@style/AppTheme” >
<activity
android:name=”com.sample.test.Test”
android:label=”@string/app_name” >
<intent-filter>
<action android:name=”android.intent.action.MAIN” />

<category android:name=”android.intent.category.LAUNCHER” />
</intent-filter>
</activity>
</application>

</manifest>
Underling Text View in Android

There are three ways of underling the text in Text View.

  1. SpannableString

  2. setPaintFlags(); of TextView

  3. Html.fromHtml();

Let me explain you all approaches :

1st Approach

For underling the text in TextView you have to use SpannableString

String udata="Underlined Text";
SpannableString content = new SpannableString(udata);
content.setSpan(new UnderlineSpan(), 0, udata.length(), 0);
mTextView.setText(content);

2nd Approach

You can make use of setPaintFlags method of TextView to underline the text of TextView.

For eg.

mTextView.setPaintFlags(mTextView.getPaintFlags() | Paint.UNDERLINE_TEXT_FLAG);
mTextView.setText("This text will be underlined");

You can refer constants of Paint class if you want to strike thru the text.

3rd Approach

Make use of Html.fromHtml(htmlString);

String htmlString="<u>This text will be underlined</u>";
mTextView.setText(Html.fromHtml(htmlString));

Multi Colors for Single Text view in Android

String your1stString=”Welcome”;
String your2ndString=”RAJA”;
String data=”<font COLOR=\”RED\”><b>” + your1stString + “</b></font> TO <font COLOR=#ff0000><b>” + your2ndString + “</b></font>”;

textviewobj.setText(Html.fromHtml(data));